LearnGuides
Connect InboxKit Mailboxes to SendKit in Under 2 Minutes
By Mohit MimaniPublished on: Apr 11, 2026 · 8 min read · Last reviewed: Apr 2026
TL;DR
SendKit is the only sequencer integration in InboxKit that uses a single API key, auto-detects your workspace, and blocks the export until your SendKit OAuth credentials are configured. Here is the exact flow.
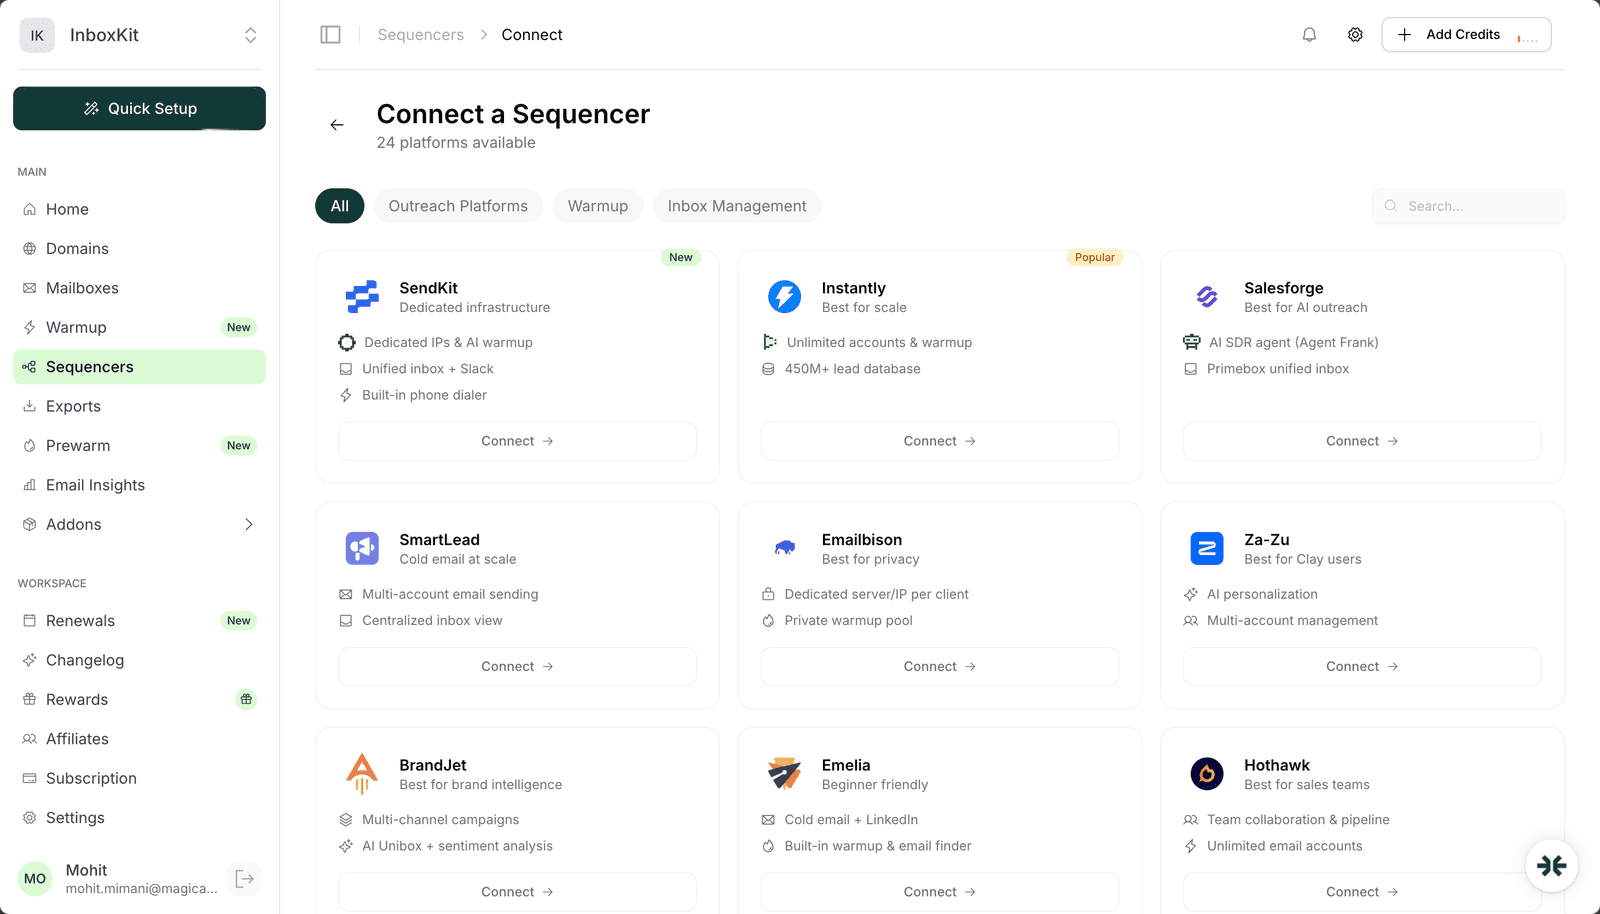
SendKit is the shortest integration in the InboxKit catalog. Instead of email + password per mailbox, or a bulk CSV upload, you paste a single SendKit API key into the InboxKit Sequencers Connect screen. InboxKit validates the key against SendKit in under a second, fetches your SendKit workspace name, and blocks the export until your SendKit workspace has Google or Microsoft OAuth credentials configured. That last part is the only common stumble, and this guide walks through exactly how to unblock it.
The whole setup takes around 90 seconds once you have the API key in your clipboard. There is no SMTP host to remember, no IMAP port, no app password, and no per-mailbox OAuth consent screen. This is the flow to use if you are running a dedicated SendKit infrastructure and want every new InboxKit mailbox to show up inside SendKit automatically. If you are still evaluating the platform, our full SendKit review and best cold email sequencers ranking cover exactly where it fits.
Every other sequencer in the InboxKit Connect screen asks for an email + password (Instantly, Smartlead, Reply.io, Salesforge) or a CSV upload. SendKit is different because of three architectural choices:
| Design choice | What it means for you | Why it matters |
|---|---|---|
| Workspace-scoped API keys | One key = one SendKit workspace, not one user | Safer than sharing a login |
| Managed OAuth in SendKit | Google/Microsoft OAuth lives inside SendKit, not InboxKit | Your mailboxes inherit SendKit's compliance review |
| Account info returned on validation | InboxKit shows you the workspace name and owner email before you connect | No accidentally connecting the wrong workspace |
The validation is specifically implemented in the InboxKit connect flow as a debounced API key check (800ms) against SendKit's verify endpoint. If the key is invalid you get an 'Invalid API Key' badge. If the key is valid but your SendKit workspace is missing OAuth credentials, you get a yellow 'OAuth setup required' warning that blocks the submit button until you fix it. Compare this to the 6-step app password flow required for Instantly and you see why SendKit users stay with SendKit.
Before you open the InboxKit Sequencers Connect screen, have these ready:
| Item | Where to find it | Required |
|---|---|---|
| SendKit account with Professional plan or higher | app.sendkit.ai | Yes |
| SendKit API key | SendKit → Settings → API Keys → Generate new key | Yes |
| SendKit workspace OAuth configured | SendKit → Mailboxes → OAuth Setup | Yes (blocks export otherwise) |
| InboxKit Professional plan or higher | inboxkit.com/pricing | Yes |
| At least one InboxKit mailbox provisioned | InboxKit → Mailboxes | Yes |
| SPF, DKIM, DMARC, MX records live on the sending domains | InboxKit handles this automatically via Cloudflare in under 60 seconds | Yes |
The OAuth credential trap. SendKit requires a workspace-level Google OAuth Client ID and Client Secret (plus a Microsoft equivalent if you are sending from Microsoft 365 mailboxes). This is not the same as per-mailbox OAuth. It is a set of workspace credentials that SendKit uses to impersonate the mailbox during sending. If your SendKit workspace does not have these set, InboxKit will refuse to finalize the connection and show a yellow warning card with the direct URL to the SendKit OAuth setup screen: https://app.sendkit.ai/dashboard/mailboxes?oauth-setup=true. Click that link, configure the Client ID and Secret in SendKit, then come back and retry.
Once the prerequisites are green, the actual connection is a single screen in InboxKit.
| Step | Action | Expected time |
|---|---|---|
| 1 | Open InboxKit → Sequencers → Connect New Sequencer | 5 sec |
| 2 | Pick SendKit from the catalog (it is sorted first, with a 'new' badge) | 5 sec |
| 3 | Paste your SendKit API key into the single API Key field | 5 sec |
| 4 | InboxKit auto-validates the key after 800ms, shows a green 'API Key Verified' badge with your SendKit workspace name and owner email | 1 sec |
| 5 | Review the workspace card, confirm the name matches the SendKit workspace you expect | 5 sec |
| 6 | If the workspace status says 'configured', click Connect Account | 5 sec |
| 7 | InboxKit pushes every selected InboxKit mailbox into that SendKit workspace via its managed OAuth | 20-40 sec |
| 8 | You get redirected to /sequencers with a success toast | — |
Total: about 90 seconds, start to finish.
The only screen you see is the InboxKit Sequencers Connect screen with a single API Key field, a workspace details card below it, and a Connect Account button. There is no email, no password, no SMTP server dropdown, no per-mailbox consent screen. This is intentional. SendKit handles all the per-mailbox OAuth inside its own app.
This is the warning that stops roughly 90% of first-time SendKit connections. It looks like an amber card with the text 'Your SendKit workspace needs Google/Microsoft OAuth credentials configured before mailboxes can be exported.'
Here is exactly how to unblock it:
| Step | Action | Who |
|---|---|---|
| 1 | Click the copy button next to https://app.sendkit.ai/dashboard/mailboxes?oauth-setup=true in the InboxKit warning | You |
| 2 | Open the URL in a new tab (SendKit login required) | You |
| 3 | Paste your Google OAuth Client ID, from Google Cloud Console → APIs & Services → Credentials | Workspace admin |
| 4 | Paste your Google OAuth Client Secret, same Credentials screen | Workspace admin |
| 5 | (Microsoft 365 only) Add the Microsoft App Registration Client ID and Secret from Azure Portal → App registrations | Workspace admin |
| 6 | Click Save in SendKit | You |
| 7 | Return to the InboxKit tab, the warning clears automatically within ~2 seconds (SendKit pushes the status change via the same verify endpoint) | — |
| 8 | Click Connect Account | You |
Where the Client ID and Secret come from. Google OAuth credentials come from Google Cloud Console → APIs & Services → Credentials → Create OAuth client ID → Web application. Authorized redirect URIs must include https://app.sendkit.ai/auth/callback (SendKit's own docs list the exact URI). For Microsoft 365, go to Azure Portal → Microsoft Entra ID → App registrations → New registration and configure delegated Mail.Send and Mail.ReadWrite permissions.
The reason SendKit routes OAuth this way is that API scope review is done once per workspace instead of per mailbox. If you add 50 mailboxes, you do not approve 50 consent screens. You approve zero. That is the main speed advantage over the Instantly per-mailbox OAuth flow.
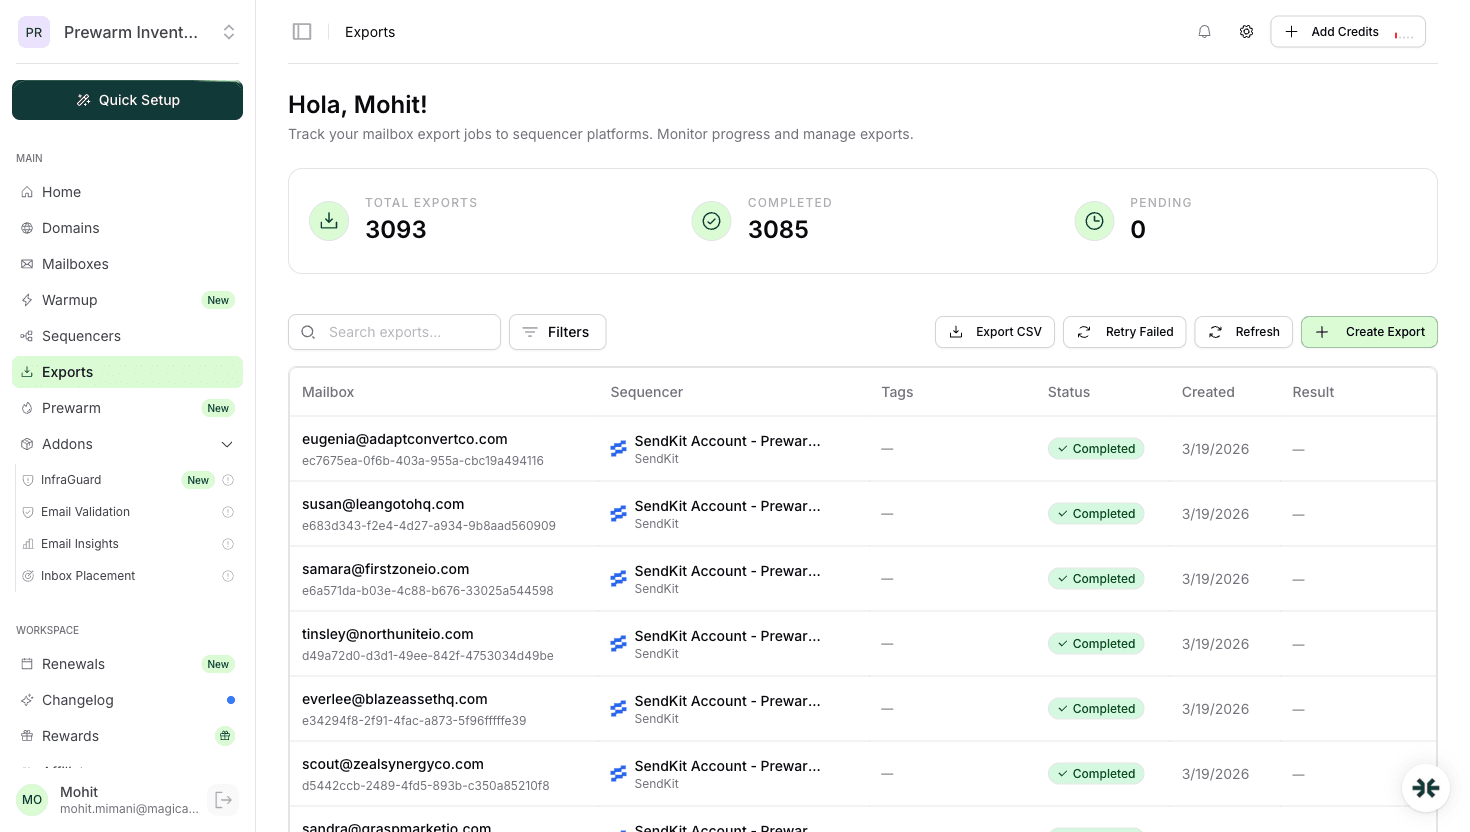
Once the OAuth warning clears and you click Connect Account, InboxKit sends SendKit the data for every mailbox in your selected export set. The payload for each mailbox looks like this:
| Field | Value | Notes |
|---|---|---|
| john@acmedomain.com | Full mailbox address | |
| first_name, last_name | From InboxKit profile | Used by SendKit for {{firstName}} merge tokens |
| provider | google or microsoft | Tells SendKit which OAuth flow to initialize |
| tags | From InboxKit mailbox tags | Carried over for sequence targeting |
| daily_limit | Defaults to 30 for new mailboxes | You can override in SendKit after |
| warmup_status | Enabled if InboxKit warmup add-on is active | SendKit does not re-warm mailboxes that InboxKit already warms |
SendKit does not receive passwords, app passwords, or refresh tokens from InboxKit. It initializes its own OAuth handshake against your workspace credentials after InboxKit hands off the mailbox identity. If you later rotate the SendKit API key in SendKit → Settings, InboxKit's background sync will start failing with 401 Unauthorized. Fix it by rotating the key in the same InboxKit connection (Sequencers → SendKit → Edit → paste new key).
SendKit ships a dedicated warmup network. InboxKit ships an isolated warmup add-on at $3 per mailbox per month. Running both at the same time on the same mailbox is a bad idea.
| Warmup source | Cost | Network size | When to use |
|---|---|---|---|
| SendKit dedicated warmup | Included in SendKit plan | SendKit private pool | If you are all-in on SendKit |
| InboxKit isolated warmup add-on | $3/mailbox/month | Separate InboxKit peer pool | If you are multi-sequencer or want to keep warmup independent of sender tool |
Pick one. Running two warmup networks on the same mailbox roughly doubles warmup-sent volume, confuses reputation signals at Gmail Postmaster, and can trigger deliverability dips. If you moved a mailbox from InboxKit warmup into SendKit warmup, turn off the InboxKit warmup subscription for that mailbox in InboxKit → Mailboxes → Warmup toggle. See the email warmup tools comparison for a deeper look at how the peer networks differ.
For domain-level setup (SPF, DKIM, DMARC), none of this changes with SendKit, since InboxKit already handles the DNS side in under 60 seconds via Cloudflare. If you are setting up a brand new domain, go through the cold email domain setup checklist once, then the SendKit connection is the last step.
These are the five specific errors the InboxKit connect flow can surface for SendKit, and exactly what to do about each:
| Error badge | Root cause | Fix |
|---|---|---|
| 'Invalid API Key' | Typo, trailing whitespace, or key deleted in SendKit | Regenerate key in SendKit → Settings → API Keys and paste the new value |
| 'Service Unavailable' | SendKit verify endpoint is down or InboxKit cannot reach it | Wait 60 seconds and retry. The debounced validation re-fires on keystroke, so edit the key by one character and press backspace |
| 'OAuth setup required' | Workspace Client ID/Secret missing in SendKit | Visit app.sendkit.ai/dashboard/mailboxes?oauth-setup=true and configure |
| Connect button stays disabled | Either API key not validated, or workspace mailbox setup not configured | Check the workspace card, both state indicators must be green |
| Export completes but mailboxes missing in SendKit | SendKit workspace status is 'paused' or 'suspended' | SendKit → Billing → reactivate workspace, then retry in InboxKit |
One subtle gotcha: the API key is workspace-scoped, not user-scoped. If you generate a SendKit API key while logged in as a workspace admin but paste it while the SendKit workspace is in a 'trial expired' state, validation still passes (the key is valid) but the export will fail silently with zero mailboxes added. Check the workspace status badge in the InboxKit workspace card before hitting Connect. If it says anything other than 'active' or 'configured', fix that in SendKit first.
Do not trust the green success toast alone. Run this smoke test before launching a campaign:
Test 1, round-trip a single mailbox. In SendKit, find one of the freshly imported InboxKit mailboxes, click Send Test to your own inbox. Expected: email lands in <30 seconds, shows via sendkit.ai in the headers, and DKIM signs with your sending domain.
Test 2, inbox placement test. Send a test to a seed list (Gmail, Outlook, Yahoo, Hotmail). Aim for 9/10+. Anything below 8/10 means your DNS or warmup needs more time. See inbox placement testing explained for the full methodology.
Test 3, reply round-trip. Reply to the test email and confirm SendKit Unibox picks it up within 2 minutes. If not, the IMAP side of the workspace OAuth is misconfigured (usually a missing Mail.ReadWrite scope).
Test 4, a one-mailbox pilot campaign. Before loading the full sequence, run a 10-prospect campaign from a single InboxKit mailbox for 2 days. Check for bounces, spam complaints, and SendKit's native reputation graph. If all green, scale up. For the math on how to scale from 1 to 10,000 sends per day, see the scale cold email playbook.
No. SendKit API keys are scoped to a single SendKit workspace. If you run multiple InboxKit workspaces and want each to export to a different SendKit workspace, generate a separate SendKit API key per workspace and paste each into the matching InboxKit Connect flow.
The key is invalidated immediately. The next time InboxKit tries to push a new mailbox, it will fail validation with 'Invalid API Key' and the InboxKit Sequencers page will flag the connection as needing attention. There is no automatic re-discovery. You must manually re-connect to a new workspace.
They layer, they do not replace. InboxKit mailboxes already send from US-based IPs. SendKit's dedicated IP tier adds a reserved sending IP on top, which further isolates your reputation from other SendKit tenants. For most users the US IPs alone are enough, upgrade to dedicated IPs only when you cross 10,000 sends per day per mailbox pool.
InboxKit pins SendKit to the top of the platform list because it is the only sequencer in the catalog with its own dedicated infrastructure stack, the connection is a direct handoff between two cold email infrastructure products. Every other platform in the list is a pure sender or warmup layer, so they are grouped by category below.
Only if you need isolated warmup, InfraGuard blacklist monitoring, Azure mailboxes at $30 per tenant, or the ability to provision mailboxes across Google Workspace, Microsoft 365, and Azure from a single dashboard. If SendKit's native mailbox sourcing meets your volume, you can skip InboxKit for that workflow. Many agencies run both. InboxKit for provisioning and warmup, SendKit for sending and reply handling.
Plans from $39/mo with 10 mailboxes included. Automated DNS, warmup, and InfraGuard monitoring included.